Using Thread.
To control a conveyor that has a function related to the machine the Robot is tending can by advantage be controlled from the Robot program. One way to do this is to use the function ”Thread”.
First lest assume we have a program that is tending a machine. In this small example below Waypoint 1 and 2 is at the machine and grapping a work piece.
Waypoint 3 and 4 is at the conveyor and at Waypoint 4 the gripper is released and the work piece is delivered to the conveyor.
A Thread is a program sequence that is run in parallel of the main robot program and this can be totally independent of the robot task – or it can be related to the robot task – up to the programmer to choose.
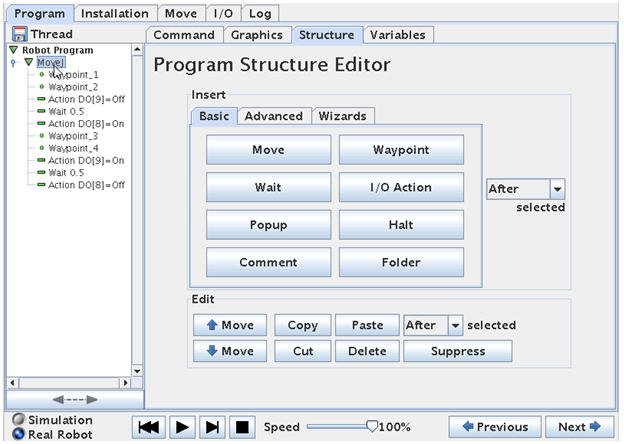
This program snippet is at the machine side, but the conveyor is not moving – and now we want to have the conveyor to move a notch forward after the robot has delivered a new work piece and then simultaneously let the robot continue its task while the conveyor is moving forward.
For this function we will use the ”Thread” which can be found in the ”Structure” menu and under ”Advanced”.

Here we got an error messages because the Thread has to be at top level. So we have to move the cursor position up and highlight ”Robot Program” in our program tree.
And then click ”Thread”.
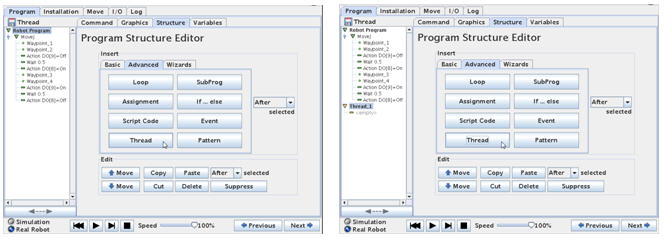
Now a Thread statement has entered our program. It is shown below our Main program which is slightly confusing because we got told before that it should be at top level. However it is more correct to say that the Thread is at the side of our Main program because it twill run in parallel with our main program.
The Thread can be programmed exactly in the same way as our main program – and we can even have Waypoints inside the Thread, but then make sure that is intended in relation to the main program – otherwise the Waypoint action inside the Thread might conflict with the Waypoint action in the Main program (The robot cannot be a two positions at the same time).
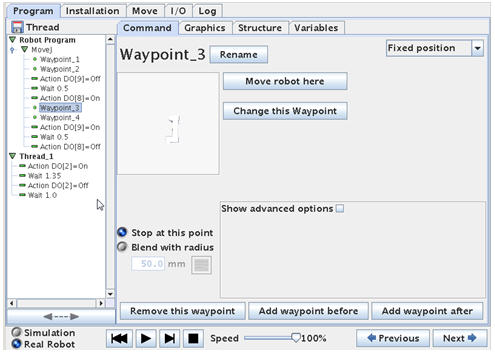
We want the conveyor to go on for a short while – and the off the conveyor again. An example of this function is shown under the Thread above.
This example assumes that the conveyor is controlled by out put DO2. There is a Wait in between the ON and OFF statements which is our conveyor run time.
After the OFF statement there is another Wait because otherwise the conveyor would go ON immediately we stopped it – and the result would be a continuously running conveyor.
Although this will run the conveyor in 1.35 seconds in this case – it is still independent of the robot action – which is not our intention – so we need a little more programming.
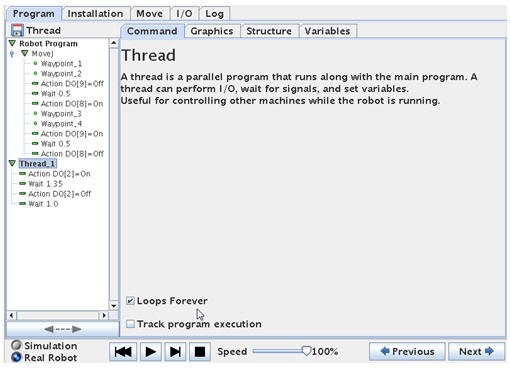
We need to synchronize the Thread with the Main Program and there are many ways to do it, but one way is setting a variable in the main program and then checking on this variable in the thread.
The plan is to set a variable at a certain value in the main program at the time we want the conveyor to start – this is a flag to the Thread program.
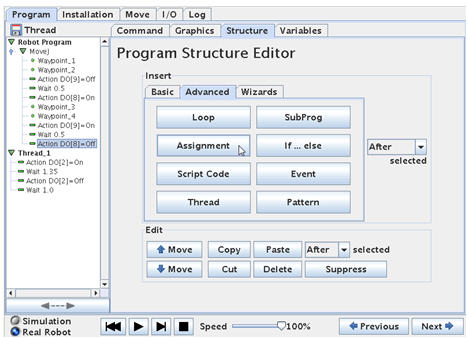
We have to identify in the main program – where is it we want the conveyor to move forward ?. In this case it is after the robot has delivered the work piece to the conveyor – which is at Waypoint 4 and after we have released the work piece.
So we put the cursor there and go to ”Structure” – ”Advanced” and choose ”Assignment”.
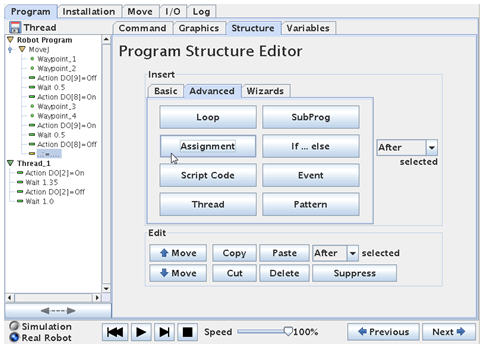
This will bring a ”=” (equal) sign into the program. We need to define the ”Assignment”.
Click on ”Command” to get the property screen for ”Assignment”.
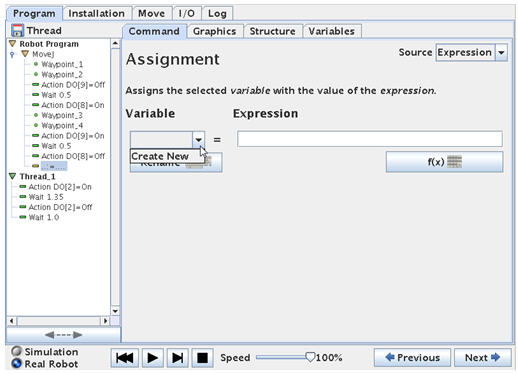
This is our first variable so we have to create it. Click on ”Create New”.
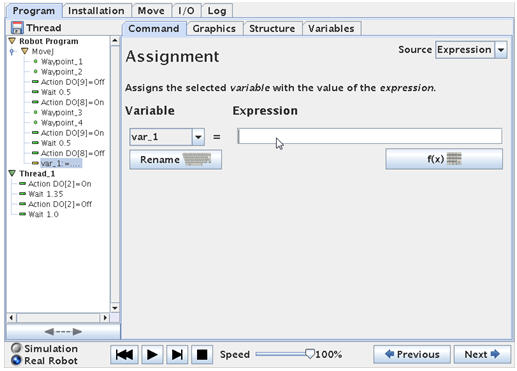
The Robot will automatically name it ”var_1”, but you can rename to your own preferred name, but often for trouble shooting and discussion with colleagues it is better to leave as the original name.
On the right hand side is an ”Expression” field because we can assign the variable a fixed value or a value base don an expression – maybe base don the previous value of the variable for example to make counters.
But in our case the variable is just a Flag to tell us where we are in the program sequence – so we just give it the value of ”1”.
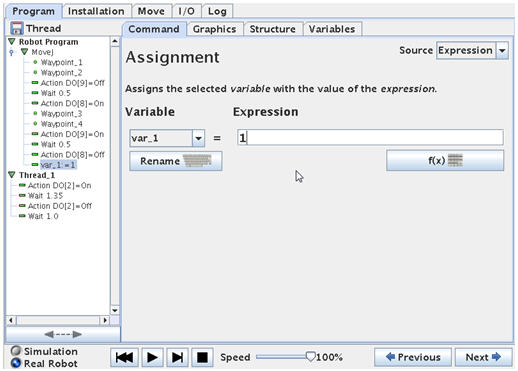
Note how the ”var_1” in the main program has been assigned to the value of 1.
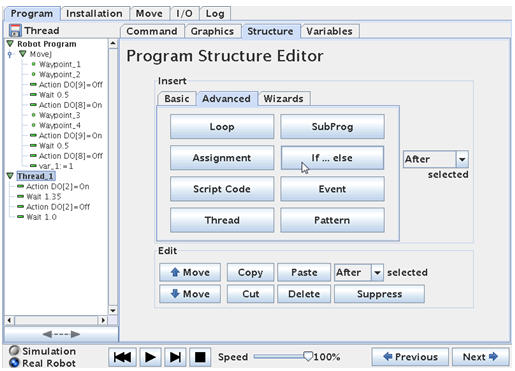
When the ”var_1” variable is 1 – it tells us that the main program has reach the point when the work piece has been delivered to the conveyor. That’s great because that’s exactly when we want the conveyor to start.
So we will make the Thread dependant on this ”var_1” variable.
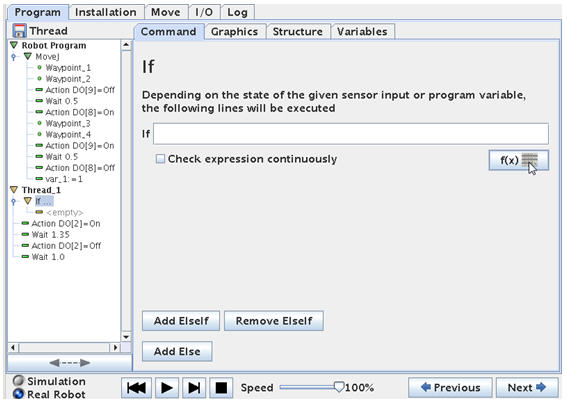
Insert an IF statement into the Thread.
Define the IF statement by clicking on the formula button.

This will bring up a screen where we can choose the ”var_1” variable and choose to design our expression as var_1=1. This means that only IF var_1 = 1 then we will execute the program line below the IF statement.
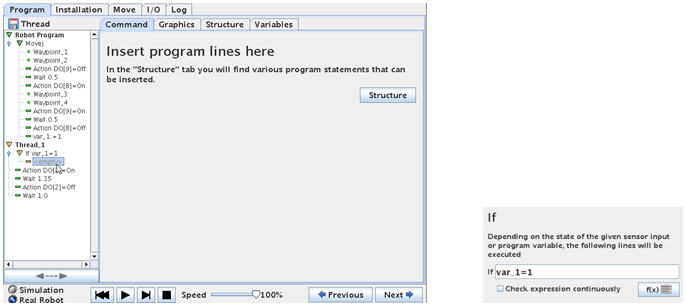
Make sure the ”Check expression continuously” is not ticked. If this is checked the robot will check IF ”var_1”=1 is true also during the Thread execution. This means that if the ”var_1” becomes 0 during the Thread execution then the rest of the program lines inside the IF will not be executed. This can lead to unintended function if not handled correct. In our case we need to set the ”var_1” to 0 inside the Thread and if we do that on top of the program lines below the IF – then the rest of the IF program lines will not be executed.
Now we have a little Editing work to do – because what we actually want the lines we originally had in the Thread to be under the IF statement (otherwise the lines will be executed no matter what is the result if the IF expression.
So we need to move those 4 lines up under the IF by using Cut/Paste or create them again.
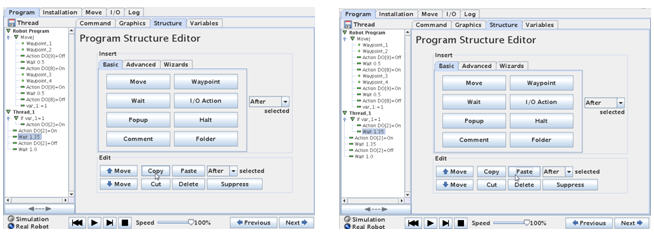
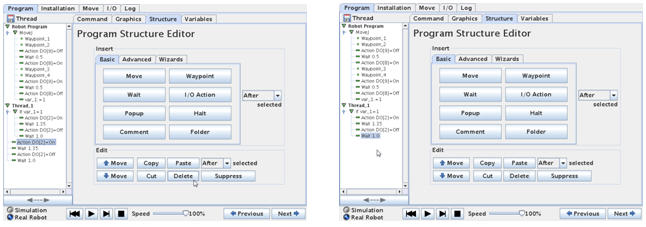
Notice how all 4 lines now is directly under the IF statement.
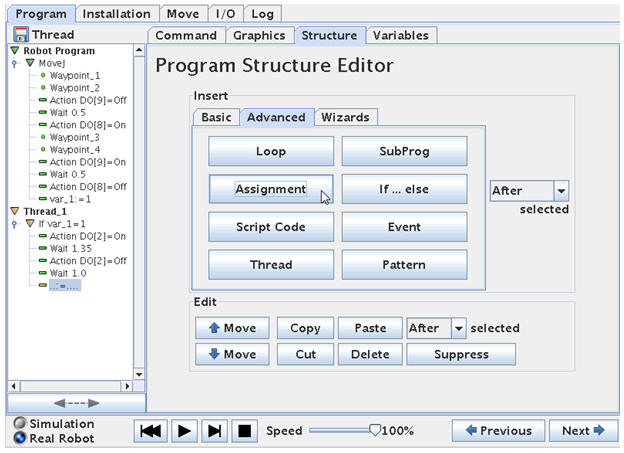
But we only want the conveyor to run one time – every time it is triggered. So we have to make sure our IF statement becomes False next time the program check the IF expression.
Therefore we insert a ”Assignment” in the Thread where we zero the ”var_1” variable so it becomes False for the IF check.
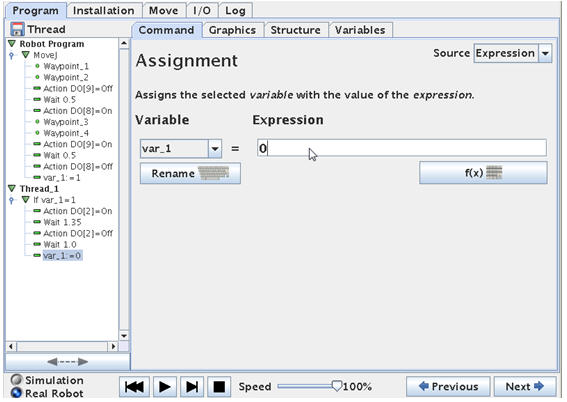
We set the ”var_1” variable to 0 in the property screen for the variable.
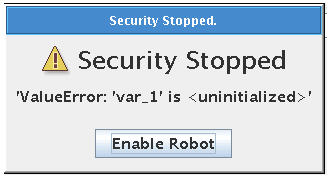
If you get this error messages it is because we need to tell the Robot – what should the variable ”var_1” be when we start the program. This is uncertain for the robot if we have not explicit set the variable before the program execution.
So we have to put the cursor up on top where it says ”Robot Program”
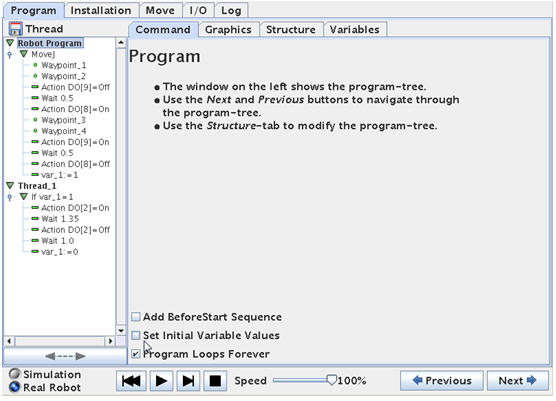
And then tick ”Set Initial Variable Values”.
This will insert a line op top of the program called ”Init Variables”.
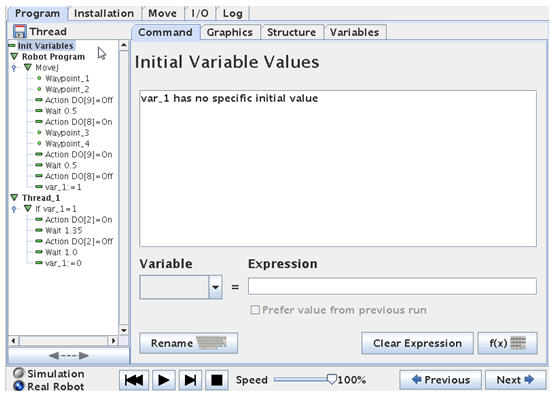
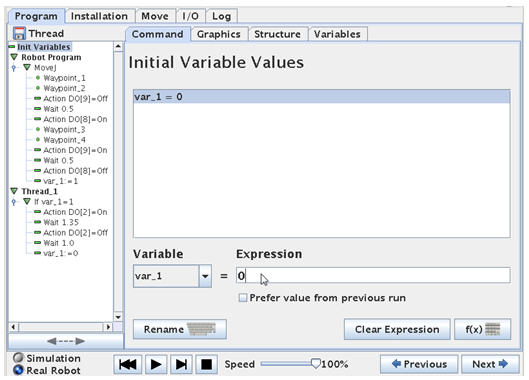
The Init Variables screen shows that the ”var_1” has no Initial Value.
Below the messages box is a function to set variables.
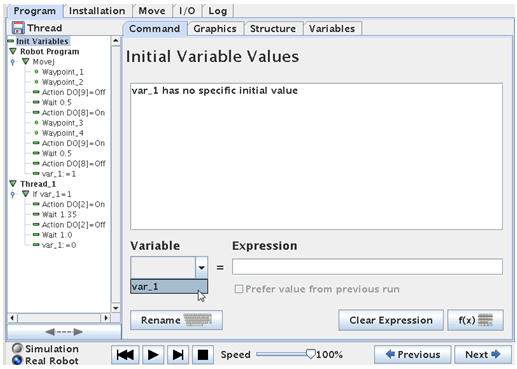
Choose ”var_1” and insert 0 in the Expression field.
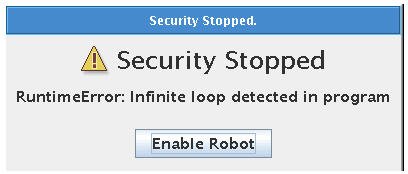
If you get this error messages is because the robot does not like to be caught in an Infinite loop. In this case the Thread program might be Infinite if the ”var_1” never change.
So we do the trick by inserting a small and very short ”Wait” and put it at a very low value e.g. 0.01 seconds.
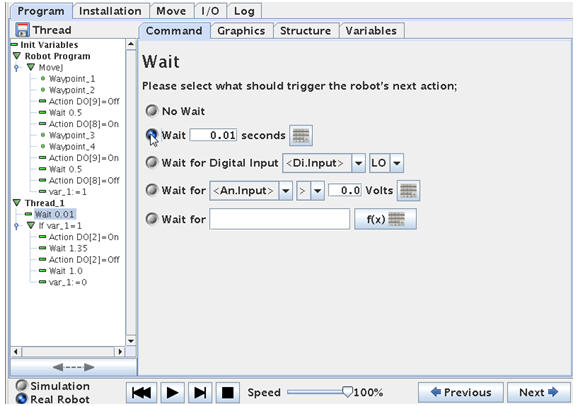
This is done before the IF statement in the Thread – so the Thread has something else to do if ”var-1” is not 1. (In this case – to wait 0.01 seconds).
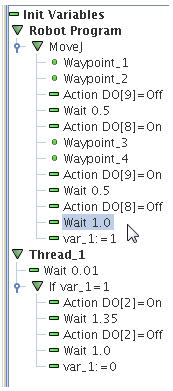
The entire program looks like this below.
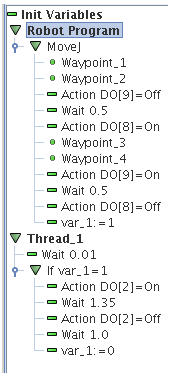
This small program is working and the logic is like this.
Before the program starts the variable ”var_1” is set to 0 in the Init Variables statement.
The Robot Program and the Thread is run simultaneously, but because the ”var_1” equals 0 the IF statement in the Thread is False at this moment so the conveyor is stopped.
The main program start moving the robot from Waypoint 1 to waypoint 2 – then the DO8 goes ON which could be the gripper closing (In my case I have set the DO9 to go off because of the configuration of the valves I use to open and close the gripper).
The robot move through Waypoint 3 and 4 – where I imagine the robot is now at the conveyor position ready to deliver the item – so the out put DO8 go off and DO9 go on. This will deliver the item onto the conveyor. Right after this I set the variable ”var_1” to the value ”1” because I want to flag to the Thread that the conveyor can move.
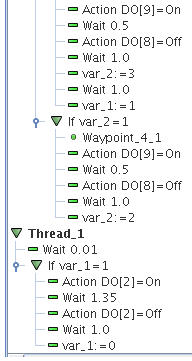
In the Thread the IF statement now see the ”var_1” as ”1” and therefore will perform our code inside the IF statement –which is to Start the conveyor DO2 is set to ON. We wait 1.35 seconds and turn the conveyor OFF again. And then the ”var_1” is set to ”0” because when the IF statement is checked again it is not False and the conveyor remains stopped – as we wish.
While the Thread is doing this and the conveyor is moving – the robot is long moved on in its cycle in the main program.
If a small Wait statement is inserted before the ”var_1” = 1 in the main program the conveyor has a delay before it starts and let the robot gripper get out of the way.
Placing the work pieces in rows on the conveyor.
If you wish to place the work pieces in rows on the conveyor – maybe 2 rows or 4 rows etc.
So in this example I will show 4 rows.
Maybe in a pattern something like this.
Basket
↑
O O
O O
O O
O O
O O
O O
Robot
The sequence the work pieces has been put on the conveyor is like this
Basket
↑
1 2
3 4
1 2
3 4
1 2
3 4
Robot
This means the Conveyor only have to move a notch forward in between 2 and 3. And again in between 4 and 1.
A way to program this is just to use variables and IF statements to keep track of the sequences of placing work pieces in this pattern in the Main program.
And then let the Thread take care of the moving the conveyor a notch forward. The Thread does actually not need to know the sequence of placing work pieces – the Thread just ON/OFF the conveyor according to the timing set inside the Thread.
So the Thread will remain like in the previously example.
(There are many different ways to do this – as many there are creative programmers).
So far there is only one Waypoint for delivering the work piece because it is always delivered at the same position on the conveyor. In previous chapter this is Waypoint 4 that is the position for delivering the work piece.
Now in this example we need 4 different waypoints for delivering the work piece on the conveyor because position 1 – 2 – 3 – and 4 are different. To keep track of the delivery position we can use another variable.
Let’s get do some programming.
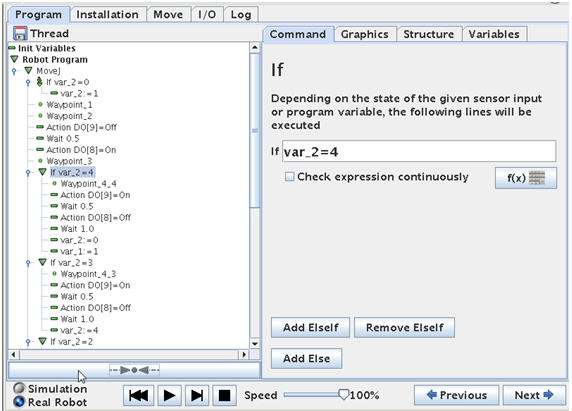
The first part of the program is almost like before until we reach the point where we have to deliver the work piece onto the conveyor.
However on top of the main program there has been an IF statement inserted which is to initialize our position counter. The position counter is a new variable called ”var_2”.
In the Init Variables block we set the ”var_2” to 0. So first time we run the program – the variable will be 0 and thereby we know this is the first run and we can change the value to 1 so we can place the first work piece at position 1.
If we use the function to store values of this variable in between runs – then we can achieve that the robot can remember which position on the conveyor is the next position – this will be explained later.
Since we have 4 different positions for the robot to deliver the work piece to – we have to create 4 waypoint for this position across the conveyor belt. These 4 waypoint will be in line across the conveyor belt because it is the moving forward of the belt that provides the zigzag pattern. So we will put the first at position 1 and then position 2 – move the conveyor a little forward – then put at position 3 and finally at position 4 and move the belt a little forward.
In the program I now call the waypoints 4_1, 4_2, 4_3, 4_4 just to illustrate that it is Waypoint 4 we are working with. There can be more Waypoints at these position e.g. an up and down and back up again for nice placement of the part.
So before programming any further we will define the Waypoint_4_1 , Waypoint_4_2 , Waypoint_4_3 , Waypoint_4_4 where we want them to be at the conveyor.
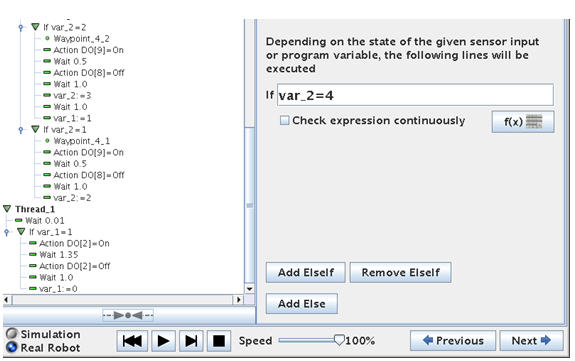
After the 4 Waypoints have been defined we will introduce 4 IF statements because we need to check where the next work piece have to be placed.
We introduced the variable ”var_2” for this purpose.
The ”var_2” can in this case have 5 different values i.e. 0, 1, 2, 3 and 4.
The value 0 is to tell that we start all over again.
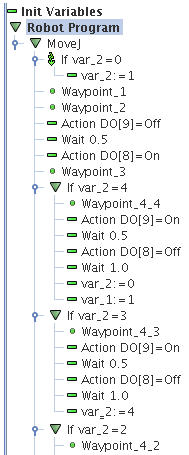
At the first run the ”var_2” will have the value 0 – which is very quickly changed to 1 in the beginning of the main program. So when we come down to the IF statements the value of ”var_2” is 1. And the program under ”IF var_2 = 1” will be executed – which is to go over to Waypoint_4_1 and deliver the part.
When the part has been delivered to Waypoint_4_1 the variable ”var_2” is set to 2 – to show the robot program that we have already been at position one and the next position in line is position 2.
Notice how the IF statement of ”IF var_2 = 4” is on top and going down to ”IF var_2 = 4”. The reason for that is because we set the ”var_2” variable inside the IF statement to the next value – and if we had the ”IF var_2 = 1” on top down to ”IF var_2 = 4” – then all IF would be executed in a row because the change of ”var_2” will make it true for the next IF. That’s why they are turned upside down.
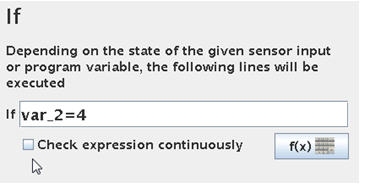
Leave the ”Check expression continuously” at each of these 4 IF statements in the main program unchecked.
Since we only need to conveyor to move forward after position 2 and after position 4 the assignment of ”var_1” is only done inside the IF statement for Waypoint_4_2 and Waypoint_4_4.
So the IF statement inside the Thread is only true after the robot has delivered to Waypoint_4_2 and Waypoint_4_4.
The entire program looks like this.
Disclaimer: While the Zacobria Pte. Ltd. believes that information and guidance provided is correct, parties must rely upon their skill and judgement when making use of them. Zacobria Pte. Ltd. assumes no liability for loss or damage caused by error or omission, whether such an error or omission is the result of negligence or any other cause. Where reference is made to legislation it is not to be considered as legal advice. Any and all such liability is disclaimed.
If you need specific advice (for example, medical, legal, financial or risk management), please seek a professional who is licensed or knowledgeable in that area.
Author:
By Zacobria Lars Skovsgaard
Accredited 2015-2018 Universal Robots support Centre and Forum.